Since I knew today would be a bit lonely, I came prepared. I knew I needed to grade some student work, but more importantly, it was time to build something I've been dreaming about for 4 years: the Hot Rod Music Cart. Now, to be clear, I do not teach from a cart, I have my own classroom - the Mobile Music Mansion isn't that mobile. Thank goodness. Instead, I was hoping to have some means of organizing the things that I use a lot during the day. I initially had lusted after a kitchen cart from Ikea, with plans to hack it into the cart I wanted, but since it cost $100 I kept having to put it off. Again. And again. For 3 years. Including several times where I was in Ikea and they didn't have that particular cart in stock. Ugh.
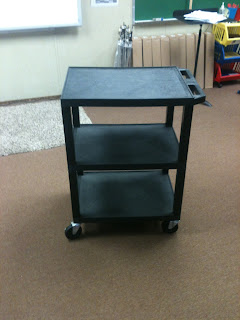
After striking out so many times, I decided it was finally time to look for another solution. Thankfully when I moved into the Mobile Music Mansion last year, someone was kind enough to leave behind a black plastic media cart. Since I used it in plain view of just about everyone last year and no one said anything, I decided that meant it was mine to use. Hooray! Then I had to decide what to do with it. What exactly did I want? Well, for starters I needed a music stand that didn't require me picking it up and moving it constantly, so that had to be attached to the cart. I also wanted storage for writing implements, as I am prone to putting them down and walking away, then forgetting where I put them. I wanted easy access to some of the tools I use for day to day instrument repair. I wanted storage space that was close at hand for band and strings method books and teacher manuals. I also wanted to be able to sort sheet music, worksheets, handouts, etc. I wanted to be able to use the top of the cart to tune violins and violas. And most importantly, I needed a place for my coffee.
Wow, that's quite the list.
So here is where I started:
Wow. Quite the pile, eh? Hey, is that a Kinder Chinder? And masking tape? And a clarinet? Nice pencil cup. My goodness.
Thankfully these things clean up easily. Here we are nice and cleared off. See those brown boxes in the background? That would be 9 ukuleles! Woohoo!
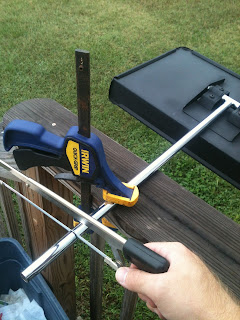
First up is cutting the post from the music stand to length. This was an old Wenger stand that wouldn't stay at the desired height. The clutch inside had worn out, so I took it apart using delicate but persistent (read: repeated and moderately violent) force. Nothing a pair of pliers and a flat bladed screwdriver couldn't handle.
Since the stand was going to rest on the middle shelf, it had to be cut down about 3 inches to keep it from being too tall. I didn't want to give my students something to hide behind, so I figured a little adjustment would be just the right perscription. I marked my cut with a Sharpie and cut it using a clamp and a hacksaw on the rear steps of the Mobile Music Mansion.
Here is what the stand looks like attached to the cart. I'd say I got the height just about perfect.
This is how it looks from the back. It's attached to the cart using a metal hose clamp and a block of 1x3 that I had in my shed at home.
Here's a closeup of my high-tech fastening solution. The hose clamp is screwed into the cart using a self-tapping screw, then the post of the stand is slid through the opening, which is then tightened. I will probably end up needing to put some sort of gasket in here to prevent the stand from twisting, but it's already pretty solid. The base is a piece of 1x3 cut down to roughly square, then attached to the shelf using two deck screws. The center of the square piece has been drilled out halfway using a 3/4" paddle bit, which just happened to be the perfect diameter for the post. It's not exactly elegant, but it will do. I'll probably paint it black at some point.
On the handles I attached a roll of masking tape using a zip tie. It hangs loosely enough to be able to use it for all of the masking tape situations I encounter on an average day (a surprising amount, really). I also looped two rubber bands together to make a sort of sling to hold my mouthpiece sanitizer spray bottle. Speaking of which, I need to make some to refill the bottle. More on that later.
Here is what the front looks like after the stand, masking tape, and spray bottle are attached. For a brief moment I thought I would stop there, but felt like something was missing.
Notice the Sharpie and pen on the front right corner? Me too.
Something must be done about that.
Notice the Sharpie and pen on the front right corner? Me too.
Something must be done about that.
Fortunately, I have been drinking sweet tea that comes in rectangular prism-shaped bottles. In the best spirit of recycling I cut the top off to use as a funnel (I swear I'll be brave enough some day to have the kids make maracas out of cans and beans in class), then I attached the bottom to the front left corner to hold my writing implements and anything else that needed a vaguely cup-shaped container.
Here is a three-quarter rear view of my completed (for the moment) Hot Rod Music Cart. Notice the music stand, pen container, and stack of books (with the binder of Turning Point clickers underneath!). I can only hope that things will stay so neat and organized.
Plans for the future -
Hot Rod Music Cart 2.0 - I want to add a set of organizers to hold sheet music, a Lack shelf from Ikea on the non-handle end, and a coffee mug holder along the lines of this one. I also had a small plastic set of drawers I picked up at Walmart several years ago that I used for the smaller tools that I need for repairs from time to time, along with rubber bands, valve oil, a spare violin bridge, and some cork grease. I imagine that the contents of these small drawers will evolve over time, but I think this is a good starting point. I also would like to come up with a means of mounting a clarinet stand and a violin hanger, but I can't decide if that is just reckless endangerment or a useful idea. More on that as it develops.
So there it is, the Hot Rod Music Cart! Hopefully the idea will inspire someone to build their own. Have you built your own Hot Rod Music Cart? Or something along those lines? Please share in the comments!
Update - 10/15: Today I realized I had no place to put my conducting baton. I often forget that I have it since I'm usually worried about it getting broken or lost. Solution? I drilled a 1/4" hole in part of the handle of the cart. Now my Mollard sits just to the right of where I stand in front of each ensemble. Good to go! (Picture coming soon)


No comments:
Post a Comment